
Module 3: BODS Installation Process
Module Objectives
After
completing this unit , you should be able to understand about:
- Preparing to Install Data Services
- Standard Installation of Data Services
- Silent Installation of Data Services
- Components
- Installation Process
- Configuring job servers
- Configuring the metadata integrator
Pre-installation
overview
Business Objects Data Services provides an
open and flexible architecture that supports a multitude of deployment and
configuration scenarios. Before you install BusinessObjects Data Services you
should:
Ø Ensure that
that your network and systems meet the basic requirements for a Business Objects
Data Services installation.
ØObtain the
BusinessObjects Data Services software by electronic download or on CD/DVD, as
well as any required licensing keycodes.
Ø Review the Business Objects
Data Services Release Notes and the Data Services Architecture section of
the Business Objects Data Services Getting Started Guide.
ØEnsure that the user who will run the
installation setup program has adequate permissions to complete the
installation tasks.
Ø Decide which
Business Objects Data Services components to install and which of your own
components to integrate.
ØDetermine
where the components should be installed and consider how you should prepare
your infrastructure and set up your environment, including server locations.
Ø If you are
using an existing database server, create a database instance if you want to
configure a repository during Data Services installation.
Ø Check
available port assignments and verify that all machines that will be part of
your BusinessObjects Data Services deployment have the required network access
to each other.
Ø Decide
whether you want to take advantage of Windows clustering fail-over support
which attempts to automatically restart your Data Services services in the event
of a hardware or Windows software failure.
Ø Choose an installation method.
System requirements
- Generally, the following components must be pre-installed and configured correctly before you can install Business Objects Data Services:
- Web application server (unless you want to use the Tomcat installation packaged with Business Objects products, or you do not want to install the Web Tier components)
- Database software that is compatible with the Data Services repository (unless you want to use the MySQLinstallation packaged with the Data Services installer).
- When installing Business Objects Data Services on multiple machines, we must ensure that each machine can communicate over TCP/IP with the machine running the database that contains the repository.
- Client components, such as the Data Services Designer, require network access to the Data Services Job Server(s).
- If the servers are firewalled, you may need to open the necessary ports to allow the Data Services client components to communicate with the servers.
To successfully install Business Objects
Data Services on Windows, the user running the setup program must have the
permissions listed in the table below.

Choose components and determine component distribution
The installation program can install
multiple Data Services feature categories

Choose
components and determine component distribution

Create a database for each repository
Data Services
uses four types of repositories:
- Local —working repositories where you create and modify applications.
- Central —supports multi-user development and allows for check-in and check-out. Also provides versioning to keep and allow restore for several versions for the same object.
- Profiler —stores profiling metadata when the built-in Data Services profiler is configured.
- Global Parsing Option —stores dictionaries for the Global Parsing Options used by Data Cleanse transforms.
Check port
assignments
- Verify that all ports to be used by Data Services components are available and not in use by other programs on each computer.
- For a development system, you can install many components on the same computer. This simplifies many connections between components (the host name is always the same), but you must still define connections based on TCP/IP protocol.

Check network connections
- Before you install Data Services components, check the computers involved and verify network connections by executing the ping command on each computer.
- For example, if the Designer will be on a Windows computer and your Job Server will be on a UNIX computer, from the Windows computer open the DOS prompt and enter:C:\> ping host name where hostname is the host name of the UNIX computer.
- Then from the UNIX computer, log in as root and from the prompt, enter:$ ping host name where host name is the host name of the Windows computer.
Create a Windows cluster
- To take advantage of fail-over support for Data Services services in a Windows Clustering Environment, you must create a Windows cluster before you install Data Services.
- If you choose this option, in the event of a hardware failure or Windows software failure, the Windows Cluster Manager will attempt to restart your Data Services services.
Repository database
requirements and preparation
- BusinessObjects Data Services stores your design metadata for source and target tables as well as database functions and definitions of built-in Data Services objects in database tables. This set of database tables is called the Data Services repository.
- We can create one repository during installation. If you want to create a repository in an existing database, you must create space for the repository before you run the Data Services installation program. The Data Services installation program connects to the repository and populates it.
- A Data Services repository requires a minimum of 20 MB of free disk space on the database server.The following sections detail required settings for:
- IBM DB2
- Microsoft SQL Server
- MySQL
- Oracle
- Sybase ASE
- Before you install BusinessObjects Data Services, you should review this information in order to properly prepare your repository database.
Installation Scenarios
Standard installation
overview
- A standard installation allows you to specify which components to install. We may want to perform a custom installation when you want to exclude some components, or install only a limited set of components.
- The installable feature categories include:
- Server Components
- Client Components
- Web Tier Components
- Message Client Components
- Documentation Components
- By default, MySQLis installed as the repository database, and Tomcat is installed as the web application server. You can also choose to use your own database or web application server during the installation process.
Silent installation overview
- We can run a silent installation to install BusinessObjects Data Services from the command line using a response file containing installation setup parameters. This method is particularly useful when we need to perform multiple installations or we do not want to interrupt people who are working on machines in our system.
- We may want to choose a silent installation if:
- We are already familiar with the BusinessObjects Data Services installation program.
- We need an automated method for performing similar installations on several machines.
- We do not want to run the BusinessObjects Data Services Setup program.
PRE INSTALLATION of BODS –INSTALL RDBMS TOOL (Oracle/MSSQL Server/DB2
etc)
Install Oracle Database 10g
- Set passwords as “admin”
- After installation launch SQL from command line
- Login as sql> connect system@xe
- Password>admin
- Create user for Data Services Repository
- Sql> create user bods identified by bods;
- Sql> grant connact, resource, dba to bods;
INSTALLATION & CONFIGURATION-ORACLE
Install Oracle Database 10g
- Set passwords as “admin”
- After installation launch SQL from command line
- Login as sql> connect system@xe
- Password>admin
- Create user for Data Services Repository
- Sql> create user bods identified by bods;
- Sql> grant connact, resource, dba to bods;
We can install the
following components on Windows systems:
- Data Integrator Designer
- Data Integrator Job Server
- Data Integrator Access Server
- Data Integrator Administrator

Beginning
your installation
- The following instructions lead you through the initial steps of setting up your BusinessObjects Data Services installation on Windows. In this stage you will do the following:
- Agree to the license terms.
- Enter the product key codes.
- Select where to install BusinessObjects Data Services.
- Select which features to install.
- When you perform the following installation setup, all the components that you select are installed on the local machine.
- You can start the installation setup by running setup.exe, or by inserting the application CD, selecting a language, and clicking Install if your system is configured for autorun. After the Welcome screen is displayed, click Next to begin your installation.
INSTALLATION
& CONFIGURATION-DATA SERVICES
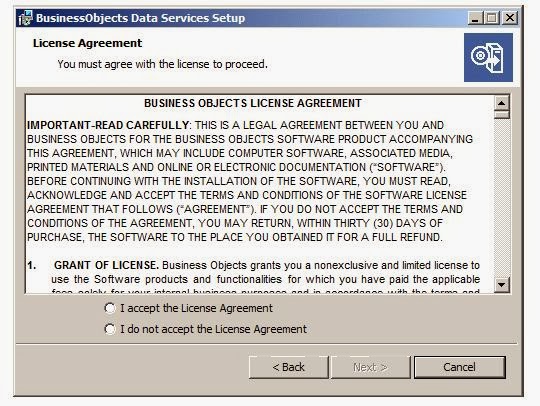
At the "License Agreement",
review and accept the license agreement for BusinessObjects Data Services. You
must accept the agreement to continue with the installation setup.
ENTER PRODUCT
CODE
At the "User Information"
screen, enter user information and provide a product code for your
BusinessObjects Data Services installation.

INSTALLATION
LOCATION (DEFAULT)
At the "Directory Selection"
screen, enter the location for your BusinessObjectsData Services installation.

SELECT
FEATURES (DEFAULT SELECTION)
At the "Select Features" screen,
choose which components to install.

SELECT
FEATURES (DEFAULT SELECTION)
You can select or deselect the following
categories and their sub-components:

REPOSITORY
SELECTION(CHOOSE SECOND OPTION)
v At the "Repository Selection"
screen, choose which type of database to use for the repository.
v At the "Repository Selection"
screen, choose which type of database to use for the repository.

REPOSITORY
LOCATION (Oracle)
• Database type: Oracle
•
Database connection name: xe
•
User: bods
• Pass: bods
REPOSITORY
LOCATION (My SQL)
v The "My SQL Database Server
Configuration" screen appears if you chose to install My SQLas the database
server for the new installation.

CREATE
REPOSITORY
v The "Local Repository Location"
screen appears if you chose to use an existing database server as your
repository for the new BusinessObjects Data Services installation. At this
screen, specify the connection information for the database where the
repository will be created.

JOB
SERVER (DEFAULT)
v At the "Configure Job Server"
screen, create a new job server.

LOGIN
INFORMATION FOR WINDOWS SERVICE(CLICK “USE SYSTEM ACCOUNT”)
v At the "Login Information"
screen, specify the account that the Data Services Windows service will use to
start Job and Access Servers.

ACCESS
SERVER-CLICK SKIP
v At the "Configure Access Server"
screen, create a new access server.

METADATA
INTEGRATOR-CLICK SKIP
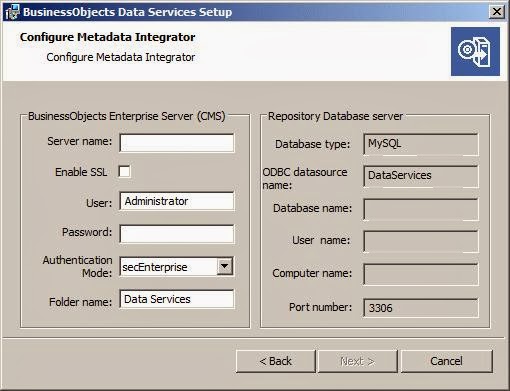
v If you chose to install Metadata
Integrator and BusinessObjects Enterprise is already installed, the
"Configure Metadata Integrator" screen appears. At this screen,
create a new Metadata Integrator configuration.

To specify
Metadata Integrator configuration details
v At the "Configure Metadata
Integrator" screen, specify details for your Metadata Integrator
configuration.
To specify
Metadata Integrator SSL details
v If you chose to enableSSL for the Meta data
Integrator, the "Configure repository for Meta data Integrator" screen
is displayed. At this screen, specify the SSL details for your Meta data Integrator
configuration.

To select a web application server
configuration option
v If you chose to install the Web Tier Components, you need to provide information about the web application server that will work with your Business Objects applications. Use the "Select Web Application Server“ screen to either install Tom-cat as your application server,or to work with your existing web application server.

CLICK INSTALL TOMCAT APP SERVER

CONFIGURE
TOMCAT APP SERVER (DEFAULT)
v The "Configure Tomcat" screen is displayed during installation set-up if you choose to install Tom-cat as the web application server for your current Business Objects Data Services installation. At this screen, configure Tom-cat and the Java SDK.

To configure an existing Web application server
v The Configure Web Application Server screen is displayed
during installation after you specify an existing server in the Select Web
Application Server screen. To properly install web components on your web
application server, you must provide specific configuration information about
your existing web application server.
Specify the required
configuration information for your existing web application server.
Click Next to continue the
installation setup.The "Start Installation" screen is displayed.
To start
the installation
v The "Start Installation" screen is the final
screen in the installation setup.
Review the components that
will be installed and any associated settings.
- If you want to make changes, use the Back button. All entries are retained; you do not need to re-enter all the information.
- Click the Next button to start the installation process.
- At the end of installation, you can launch the Data Services License Manager automatically by checking Launch License Manager before clicking Finish.
- CONTINUE INSTALLATION
- Click Next & wait for Installation to be over.
- Restart Computer
After Installing Data Services
Starting Data Services automatically
The Data Services service
and packaged Tomcat service start automatically when the computer restarts. The
Data Services service then starts Job Servers and Access Servers on the
restarted computer.
You can change service
startup to Manual in the Windows Services window.
Logging in to the Management Console
v After an Access Server is running, you can configure
it by using the Data Services Management Console.
v From the Start menu, select Programs >
BusinessObjects XI 3.0 > BusinessObjects Data Services > Data Services
Management Console. Log in to Data Services Management Console using the
default name (admin) and password (admin).
Using
the Repository Manager
v Use the Data Services Repository Manager to check the
version, to upgrade, or to create a repository after installation:
From the Start >
Programs > Business Objects XI 3.0 > BusinessObjects Data Services menu,
choose Data Services Repository Manager.
To check the version of an
existing repository, click Get version.
Using
the Server Manager
v Use the Data Services Server Manager to create, edit,
or delete Job Servers and Access Servers after installation:
1.From the Start menu,
choose Programs > Business Objects XI 3.0 > BusinessObjects Data Services
> Data Services Server Manager.
2.Follow the procedures in
the next sections to configure Job and Accessservers as needed.
3. In the Data Services
Server Manager window, click Restart.

Then Configure the Job Server.
- Configure run-time resources for Job Server.
- Configure Access Server.
- Verify that Job and Access Servers are running.
Using the License Manager
- License Manager is a Business Objects application that lets you manage your product activation keycodes—the alphanumeric codes that are referred to each time that you run certain Business Objects products.
- By using the License Manager application, you can view, add, and remove product activation keycodesfor Business Objects products (such as BusinessObjects Data Services) that require them.
- You can run License Manager after the Data Services installation has completed. You can either locate where it’s installed or access it through the Start menu.
Installing and configuring the Metadata Integrator
- The Metadata Integrator reads through Crystal Reports, Business View, Universe, Desktop Intelligence document, and Web Intelligence document definitions on a Central Management Server (CMS) to find the tables and columns used by the reports, views, and documents.
- The Metadata Integrator stores the information in Data Services repository for impact analysis and lineage analysis. You can install the Metadata Integrator on multiple CMS systems and store the report information in one Data Services repository.
Installing Metadata Integrator
- You can install the Metadata Integrator on multiple CMS systems and store the report information in one Data Services repository.
- Metadata Integrator has the following prerequisites:
- Runs on Windows only
- Must have the BusinessObjects Enterprise client installed
Configuring the Metadata Integrator
1.
When the Metadata Integrator Configuration window displays, chooseone of the following options:
a. To
add a new Metadata Integrator, select the Add Metadata Integrator option
and click Next.
b. To
change an existing Metadata Integrator, select the Edit Metadata
Integrator option, select the name of the Metadata Integrator in the drop-down
list, and click Next.
c. To
delete a Metadata Integrator, select the name of the Metadata Integrator in the
drop-down list, select the Delete option, and click Next.
2. On
the Business Objects Enterprise window, enter the following CMS connection information. Consult your
Business Objects administrator if you need assistance with these values.
3.
Click Next.
4. On
the "Metadata Repository" window, enter the following information toconnect to the Data Services
repository. Consult your databaseadministrator if you need assistance with
these values.
5.
(Optional) Click Test to check the connection to the metadata repository.
6.
Click Next.The
status window for Metadata Integrator Configuration displays.
7.
Click Finish.
Connecting the Data Profiler
vThe Data
Profiler installs automatically when you install Data Services. To use the Data
Profiler, perform the following steps:
- Define a profiler repository in which the Data Profiler will store the generated profile data.
- Associate the profiler repository with a Job Server on which the profiler tasks will run.
- Connect the profiler repository to the Data Services Administrator which will manage the profile data and profiler tasks.
- Connect the profiler server to the Designer from which you submit profiler tasks and view the generated profile data.
- If you plan to use Detailed profiling or Relationship profiling, ensure that you specify a pageablecache directory that contains enough disk space for your data and that you place on a separate disk or file system from the Data Services system.
REPOSITORY LOGIN

CHECK JOB SERVER IS RUNNING
Print this post

No comments:
Post a Comment